This ethereal cheesecake transforms the classic dessert into something truly magical—a cloud-like confection that melts on your tongue while delivering all the rich, creamy satisfaction you crave. The secret lies in folding fluffy marshmallow cream into silky cream cheese, creating a texture so light and airy it seems to defy gravity. Unlike traditional dense cheesecakes that require hours of baking and careful temperature control, this no-bake wonder comes together in minutes and sets to perfection in your refrigerator.
Ingredients
For the Crust:
- 2 cups graham cracker crumbs (about 16 whole crackers)
- ½ cup unsalted butter, melted
- ¼ cup granulated sugar
- ¼ teaspoon salt
- ½ teaspoon vanilla extract
For the Marshmallow Cheesecake Filling:
- 24 oz cream cheese, room temperature
- 1 cup powdered sugar, sifted
- 2 teaspoons vanilla extract
- ¼ teaspoon almond extract (optional)
- 2 cups heavy whipping cream, cold
- 1 jar (7 oz) marshmallow cream (like Jet-Puffed)
- 1 packet (¼ oz) unflavored gelatin
- 3 tablespoons warm water
For the Topping:
- 1 cup heavy whipping cream
- 3 tablespoons powdered sugar
- 1 teaspoon vanilla extract
- Mini marshmallows for decoration
- Graham cracker crumbs for sprinkling
Instructions
Step 1: Prepare the Crust Base
Preheat your oven to 350°F. In a large bowl, combine graham cracker crumbs, melted butter, granulated sugar, salt, and vanilla extract. Mix thoroughly until the mixture feels like wet sand and holds together when pressed between your fingers.
Press the mixture firmly into the bottom of a 9-inch springform pan, using the bottom of a measuring cup to create an even, compact layer. Extend the crust slightly up the sides—about ½ inch—to create a shallow well for the filling.
Bake for 10 minutes until the crust is set and lightly golden. The edges should look slightly darker but not burned. Remove from oven and cool completely on a wire rack—this step is crucial as any residual heat will melt your filling.
Step 2: Bloom the Gelatin
In a small bowl, sprinkle the unflavored gelatin over the warm water. Let it sit for 5 minutes until the gelatin absorbs the water and becomes spongy—this is called blooming. Once bloomed, microwave for 10-15 seconds until the gelatin dissolves completely into a clear liquid. Set aside to cool slightly.
This gelatin acts as insurance for your cheesecake, helping it hold its shape when sliced while maintaining that cloud-like texture.
Step 3: Create the Cream Cheese Base
In a large mixing bowl, beat the room-temperature cream cheese with an electric mixer on medium speed until completely smooth and fluffy, about 3-4 minutes. Scrape down the sides frequently—any lumps now will remain in your finished cheesecake.
Gradually add the sifted powdered sugar, beating until fully incorporated. Add vanilla extract and almond extract (if using), mixing until combined. The mixture should be silky and light.
Slowly drizzle in the cooled gelatin mixture while beating on low speed, ensuring it’s completely incorporated without creating streaks.
Step 4: Whip the Heavy Cream
In a separate clean bowl, whip the cold heavy cream with clean beaters until soft peaks form. Don’t overwhip—you want peaks that gently fold over when you lift the beaters. Overwhipped cream will create a grainy texture in your final cheesecake.
The cream should look smooth and billowy, roughly doubling in volume from its liquid state.
Step 5: Incorporate the Marshmallow Magic
Gently warm the marshmallow cream in the microwave for 10-15 seconds to make it easier to fold. Add it to the cream cheese mixture and beat on low speed just until combined—overmixing will deflate the airiness you’ve created.
Using a large rubber spatula, fold one-third of the whipped cream into the cream cheese mixture to lighten it. Then gently fold in the remaining whipped cream in two additions, being careful not to deflate the mixture. The goal is to maintain as much air as possible while ensuring everything is evenly combined.
Step 6: Assemble and Set
Pour the filling into the cooled crust, spreading it evenly with an offset spatula. The mixture should be light and fluffy, mounding slightly above the crust edges.
Gently tap the pan on the counter a few times to release any air bubbles, then smooth the top with your spatula. Cover with plastic wrap, being careful not to let it touch the surface of the cheesecake.
Refrigerate for at least 6 hours, but preferably overnight. The cheesecake needs this time to fully set and develop its signature texture.
Step 7: Create the Finishing Touches
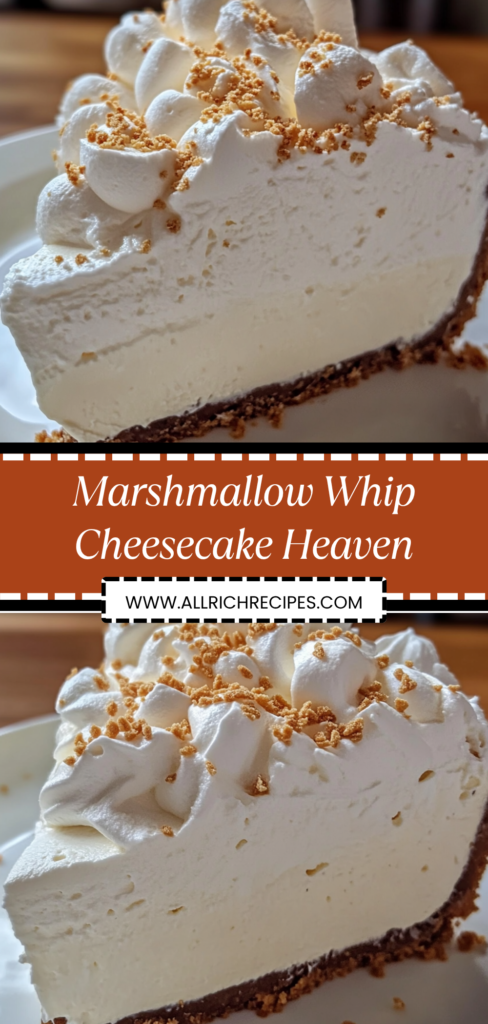
About 30 minutes before serving, prepare the topping. Whip the heavy cream with powdered sugar and vanilla until medium peaks form—slightly firmer than the cream you used in the filling.
Using a piping bag or spoon, create decorative swirls of whipped cream on top of the set cheesecake. Scatter mini marshmallows artfully across the surface and finish with a light dusting of graham cracker crumbs.
Run a thin knife around the edges before releasing the springform pan sides for clean, professional-looking edges.
Prep Time: 30 minutes | Chill Time: 6 hours | Total Time: 6 hours 30 minutes | Servings: 12 | Calories: 420 per slice
The Science Behind the Fluff
What makes this cheesecake so extraordinarily light comes down to understanding how different ingredients contribute to texture. Traditional cheesecakes rely on eggs and heat to set, creating that characteristic dense, rich mouthfeel. This version takes a completely different approach, using the natural stability of marshmallow cream combined with properly whipped heavy cream to create structure.
Marshmallow cream isn’t just sugar and fluff—it’s a carefully engineered product containing corn syrup, sugar, egg whites, and stabilizers that maintain their airy structure even when combined with other ingredients. When folded into cream cheese, it acts like thousands of tiny air bubbles suspended throughout the mixture.
The gelatin serves as an insurance policy, providing just enough structure to help the cheesecake hold its shape when sliced, without compromising the cloud-like texture. Too much gelatin would create a rubbery texture; too little and the cheesecake might not set properly.
The key technique is the folding method—this gentle incorporation preserves the air bubbles that create the signature lightness. Aggressive mixing would deflate these bubbles, resulting in a denser final product.
Mastering the Perfect Texture
Temperature control is crucial for success with this recipe. Your cream cheese must be truly at room temperature—not just taken out of the fridge an hour before. Cold cream cheese will create lumps that no amount of beating can eliminate. If you’re short on time, cut the cream cheese into cubes and let them sit for 30 minutes, or microwave briefly at 50% power.
The heavy cream, conversely, must be cold for proper whipping. Warm cream simply won’t hold peaks. If your kitchen is very hot, chill your bowl and beaters in the freezer for 10 minutes before whipping.
When folding ingredients together, use a large rubber spatula and work from the bottom of the bowl upward, rotating the bowl as you go. This motion preserves air bubbles while ensuring even distribution. Stop folding as soon as you no longer see streaks—overmixing is the enemy of lightness.
The marshmallow cream should be at room temperature or very slightly warm for easy incorporation. If it’s too cold, it will form chunks; if too hot, it might deflate your whipped cream.
Creative Flavor Variations
While the classic vanilla version is perfection, this base recipe adapts beautifully to numerous flavor variations. For chocolate lovers, fold in ¼ cup of cocoa powder with the powdered sugar, or swirl in melted and cooled chocolate for marbled effect.
Fruit variations work wonderfully—fold in ½ cup of strawberry puree, lemon curd, or raspberry sauce for fruity versions. Just reduce the marshmallow cream slightly to compensate for the added liquid.
For coffee enthusiasts, dissolve 2 tablespoons of instant espresso powder in a tablespoon of warm water and fold into the cream cheese mixture. The result is a sophisticated mocha-marshmallow hybrid that coffee lovers adore.
Seasonal variations include folding in pumpkin puree and warm spices for fall, or peppermint extract with crushed candy canes for winter holidays. The neutral base welcomes almost any flavor addition.
Troubleshooting Common Challenges
Lumpy Texture: This almost always indicates the cream cheese wasn’t at proper room temperature, or ingredients were mixed too aggressively. Prevention is key—plan ahead and let cream cheese come to room temperature naturally.
Won’t Set Properly: Usually caused by overwhipped cream that has started to separate, or gelatin that wasn’t properly dissolved. Make sure your gelatin mixture is completely clear before adding it to the filling.
Cracks on Surface: This can happen if the cheesecake is chilled too quickly or if the surface dries out. Always cover with plastic wrap, and consider placing it in the coldest part of your refrigerator gradually.
Too Dense: The most common cause is deflated whipped cream from overmixing during the folding process. Remember, gentle folding motions preserve the airiness that makes this cheesecake special.
Storage and Make-Ahead Tips
This cheesecake actually improves with time—the flavors meld beautifully, and the texture becomes even more stable after 24 hours in the refrigerator. It will keep perfectly for up to 5 days covered tightly with plastic wrap.
For make-ahead entertaining, you can prepare this cheesecake up to 3 days in advance. Add the whipped cream topping and decorative elements just before serving to maintain their appearance and texture.
The cheesecake can be frozen for up to 1 month, though the texture will be slightly denser after thawing. Wrap tightly in plastic wrap and aluminum foil, then thaw in the refrigerator overnight before serving.
Individual portions can be pre-cut and wrapped separately for easy serving at parties or events. This also helps maintain the clean appearance of the remaining cheesecake.
Presentation and Serving Ideas
The beauty of this cheesecake lies not just in its taste but in its visual appeal. The pale, creamy color provides a perfect canvas for colorful toppings and creative presentations.
For elegant dinner parties, consider serving with fresh berry compote or a drizzle of fruit coulis. The tartness of berries provides a lovely contrast to the sweet, creamy filling.
During summer months, top with fresh seasonal fruits—sliced peaches, mixed berries, or even grilled pineapple for a more sophisticated presentation. The neutral flavor profile complements virtually any fruit.
For children’s parties or casual gatherings, embrace the fun factor with colorful sprinkles, mini chocolate chips, or even crushed cookies scattered on top.
Consider serving in individual glasses or ramekins for portion control and elegant presentation. Layer the graham cracker crust, filling, and toppings for a parfait-style dessert that’s both beautiful and practical.
Nutritional Considerations and Dietary Adaptations
While this is definitely an indulgent dessert, it does offer some nutritional benefits compared to traditional cheesecakes. The lighter texture means you can enjoy satisfying portions with fewer calories per serving than dense, traditional versions.
The recipe can be adapted for various dietary needs. For reduced sugar versions, substitute half the powdered sugar with sugar-free alternatives, though this may slightly affect the texture.
Lactose-intolerant guests can be accommodated by using lactose-free cream cheese and heavy cream—the taste and texture remain virtually identical.
For those avoiding gelatin, the recipe still works without it, though the cheesecake will be slightly softer and may not hold its shape quite as well when sliced.
The Perfect Occasions
This cheesecake shines at summer gatherings where its light, refreshing quality provides the perfect ending to heavier meals. It’s particularly wonderful for outdoor entertaining since it doesn’t require last-minute preparation or serving at precise temperatures.
The impressive appearance makes it suitable for special occasions—birthdays, anniversaries, or holiday celebrations—while the easy preparation makes it practical for casual family dinners.
Children especially love the marshmallow element, making this an excellent choice for kid-friendly events. The mild, sweet flavor appeals to even picky eaters, while the cloud-like texture creates a memorable experience.
Final Thoughts
Marshmallow Whip Cheesecake Heaven proves that sometimes the most magical desserts come from the simplest techniques. By understanding how to properly incorporate air and maintain it throughout the mixing and setting process, you create something that transcends ordinary cheesecake—a dessert that feels both nostalgic and sophisticated, indulgent yet surprisingly light.
The beauty of this recipe lies in its forgiving nature and endless adaptability. Once you master the basic technique, you’ll find yourself returning to it again and again, experimenting with different flavors and presentations. Whether you’re hosting an elegant dinner party or creating a special treat for family movie night, this cheesecake delivers the perfect combination of impressive appearance and effortless execution.
The joy on people’s faces when they take that first bite—the surprise at the incredibly light texture followed by the rich, satisfying flavor—makes every minute of preparation worthwhile. This isn’t just a dessert; it’s an experience that creates lasting memories around your table.