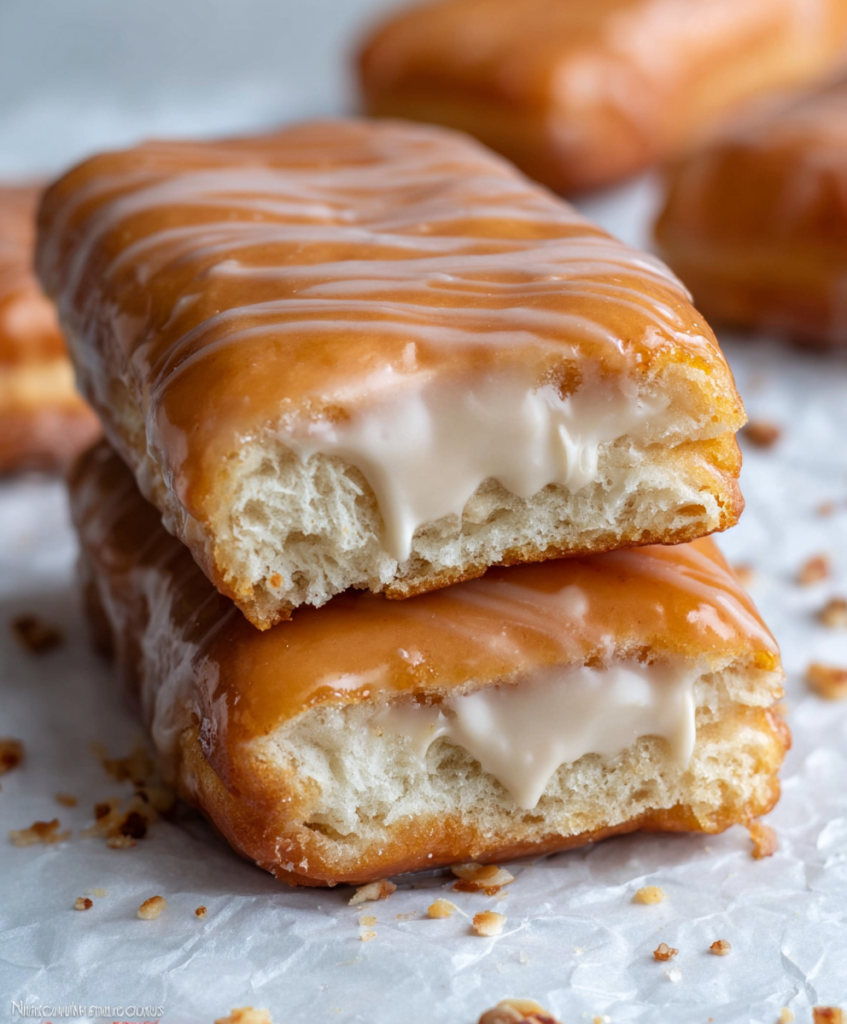
These maple donut bars capture all the nostalgic charm of your favorite bakery donuts in an easy-to-make bar form that’s perfect for feeding a crowd. The tender, cake-like base strikes the ideal balance between fluffy and substantial, while the glossy maple glaze on top provides that signature sweetness with genuine maple flavor. Unlike traditional yeasted donuts that require rising time and careful oil temperature monitoring, these bars bake in your oven and come together in about an hour from start to finish, making them accessible for any home baker craving that classic donut shop experience.
Ingredients
For the Donut Bars:
- 2 cups all-purpose flour
- ¾ cup granulated sugar
- 2 teaspoons baking powder
- 1 teaspoon salt
- ½ teaspoon ground nutmeg
- ¼ teaspoon ground cinnamon
- ⅓ cup unsalted butter, melted
- 2 large eggs, room temperature
- ¾ cup whole milk
- 2 teaspoons vanilla extract
- ¼ cup sour cream
For the Maple Glaze:
- 3 cups powdered sugar, sifted
- ⅓ cup pure maple syrup
- 4 tablespoons unsalted butter, melted
- 3-4 tablespoons whole milk
- 1 teaspoon vanilla extract
- ¼ teaspoon salt
- 1-2 drops maple extract (optional, for deeper flavor)
For Optional Toppings:
- Chopped toasted pecans
- Mini chocolate chips
- Sprinkles
- Flaky sea salt
Instructions
Step 1: Set Up for Success
Preheat your oven to 375°F and line a 9×13-inch baking pan with parchment paper, leaving an overhang for easy removal. Lightly grease the parchment with butter or cooking spray to ensure nothing sticks.
Position your oven rack in the center for even baking, and gather all ingredients to room temperature—this ensures smooth mixing and even texture in your finished bars.
Step 2: Create the Dry Foundation
In a large mixing bowl, whisk together flour, granulated sugar, baking powder, salt, nutmeg, and cinnamon until completely combined. The nutmeg is crucial here—it provides that distinctive donut flavor that separates these bars from regular cake. Make sure there are no lumps, especially in the baking powder.
Create a well in the center of the dry ingredients, which will make incorporating the wet ingredients easier and prevent overmixing.
Step 3: Prepare the Wet Ingredients
In a separate bowl, whisk together the melted butter, eggs, milk, vanilla extract, and sour cream until smooth and well combined. The sour cream is the secret ingredient that creates tender, moist bars with a slight tang that balances the sweetness.
Make sure your melted butter isn’t too hot, or it will scramble the eggs. Let it cool for a minute or two after melting if necessary.
Step 4: Combine with Care
Pour the wet ingredients into the well you created in the dry ingredients. Using a rubber spatula or wooden spoon, gently fold the ingredients together until just combined. The batter should look slightly lumpy—overmixing will develop the gluten too much and create tough, dense bars instead of tender ones.
Stop mixing as soon as you no longer see streaks of flour. The batter will be thick but spreadable, similar to a coffee cake batter.
Step 5: Bake to Perfection
Spread the batter evenly in your prepared pan using an offset spatula. The layer should be uniform but doesn’t need to be perfectly smooth—some texture is fine and actually creates nice visual interest.
Bake for 18-22 minutes, until the top is lightly golden and springs back when gently touched in the center. A toothpick inserted in the middle should come out with just a few moist crumbs clinging to it—completely clean means they’re overbaked.
The edges should be set but not dark brown. Remove from oven and cool completely in the pan before glazing—this usually takes about 45 minutes.
Step 6: Master the Maple Glaze
While the bars cool, prepare your glaze. In a medium bowl, sift the powdered sugar to eliminate any lumps that would create an uneven glaze texture.
Whisk in the maple syrup, melted butter, 3 tablespoons of milk, vanilla extract, and salt until smooth. The glaze should be thick enough to coat the back of a spoon but thin enough to spread easily. Add the fourth tablespoon of milk if needed for proper consistency.
Taste and adjust—if you want a more pronounced maple flavor, add 1-2 drops of maple extract, but use sparingly as it’s quite potent.
Step 7: Glaze and Finish
Once the bars are completely cool, pour the glaze over the top, starting from one corner and working across in smooth motions. Use an offset spatula to spread the glaze evenly, making sure it reaches all the edges.
If using toppings like chopped pecans or sprinkles, add them immediately while the glaze is still wet. The glaze will set within 15-20 minutes, creating a smooth, glossy finish.
For clean cuts, wait until the glaze is completely set, then use the parchment overhang to lift the bars from the pan. Cut into squares or rectangles with a sharp knife, wiping it clean between cuts.
Prep Time: 20 minutes | Bake Time: 20 minutes | Cool Time: 45 minutes | Total Time: 1 hour 25 minutes | Servings: 24 bars | Calories: 185 per bar
The Secret to Donut-Like Texture
What distinguishes these bars from regular cake is the careful balance of ingredients that mimics traditional cake donuts. The combination of baking powder for lift, nutmeg for authentic donut flavor, and sour cream for tenderness creates that characteristic donut texture—tender and slightly dense, but not heavy.
The ratio of wet to dry ingredients is precisely calibrated to create a batter that’s thick enough to hold its shape during baking but moist enough to produce tender results. Too much liquid would create a soggy texture; too little would result in dry, crumbly bars.
The melted butter, rather than creamed butter, contributes to the tender crumb structure while keeping the mixing method simple and foolproof. This technique, borrowed from muffin-making, prevents the overdevelopment of gluten that can make baked goods tough.
Understanding Maple Flavor Profiles
Real maple syrup varies significantly in flavor depending on the grade and harvest time. Grade A Dark Robust (formerly Grade B) provides the most intense maple flavor and works beautifully in this glaze. The deeper, more complex flavor stands up to the sweetness of the powdered sugar.
If you only have lighter maple syrup, consider adding a drop or two of maple extract to intensify the flavor. However, use extract sparingly—too much creates an artificial taste that overpowers the natural maple sweetness.
The small amount of salt in the glaze isn’t just for flavor balance—it actually enhances the perception of sweetness and makes the maple notes more pronounced. This is a professional baker’s trick that elevates homemade glazes to bakery quality.
Mixing Techniques for Success
The key to tender donut bars lies in proper mixing technique. When combining wet and dry ingredients, use a gentle folding motion rather than vigorous stirring. Overmixing develops the gluten proteins in flour, creating a tough, chewy texture instead of the tender crumb you want.
Mix just until the ingredients are combined and you no longer see streaks of flour. The batter should look slightly lumpy—this is perfect and indicates you haven’t overmixed.
Room temperature ingredients blend more easily and create a more uniform texture. If you forgot to take eggs out ahead of time, place them in a bowl of warm water for 10 minutes to quickly bring them to room temperature.
Creative Flavor Variations
While classic maple is perfection, this base recipe adapts beautifully to other flavors. For chocolate lovers, substitute ¼ cup of flour with cocoa powder and add chocolate glaze made with powdered sugar, cocoa, milk, and vanilla.
Lemon donut bars are divine—add 2 tablespoons of lemon zest to the batter and make the glaze with lemon juice instead of maple syrup. The bright citrus creates a completely different but equally delicious experience.
For fall variations, increase the cinnamon to 1 teaspoon and add ½ teaspoon of ground ginger and ¼ teaspoon of ground cloves. Top with a cinnamon-sugar mixture before baking for extra spice flavor.
Coconut enthusiasts can fold ½ cup of shredded coconut into the batter and top the finished bars with toasted coconut flakes for tropical flair.

Perfecting the Glaze Consistency
The ideal glaze should coat the bars smoothly without being so thick it won’t spread or so thin it runs off the edges. If your glaze is too thick, add milk one teaspoon at a time until it reaches the right consistency.
If it becomes too thin, sift in additional powdered sugar gradually until it thickens properly. Remember that the glaze will set as it cools, so it should be slightly thinner when you apply it than you want the final result to be.
For a glossier finish, add 1 tablespoon of corn syrup to the glaze. This creates a professional-looking shine that stays attractive even after the bars are stored.
Storage and Make-Ahead Tips
These bars keep beautifully at room temperature for up to 4 days when stored in an airtight container. Layer them between sheets of parchment paper to prevent the glaze from sticking.
For longer storage, freeze the bars before glazing for up to 3 months. Thaw completely at room temperature, then glaze just before serving for the freshest taste and appearance.
You can also make the bars a day ahead and glaze them the morning you plan to serve them—this ensures the glaze looks perfect and the bars taste their freshest.
If glazing ahead, store the glazed bars uncovered for the first hour to let the glaze set completely, then cover loosely with plastic wrap.
Troubleshooting Common Issues
Dense, Heavy Bars: Usually caused by overmixing the batter or using too much flour. Measure flour by spooning it into the measuring cup and leveling off, rather than scooping directly from the bag.
Dry Texture: Often results from overbaking or insufficient fat. Check your oven temperature with an thermometer—many ovens run hot, which can dry out baked goods quickly.
Glaze Won’t Set: This typically happens when the bars aren’t completely cool before glazing, or the glaze contains too much liquid. Make sure bars are room temperature and adjust glaze consistency as needed.
Uneven Texture: Usually indicates uneven mixing or hot spots in your oven. Rotate the pan halfway through baking if your oven has hot spots.
Professional Finishing Techniques
For bakery-quality appearance, let the glaze set completely, then drizzle additional glaze in decorative patterns on top. This creates visual interest and shows attention to detail.
Consider dusting finished bars lightly with powdered sugar for an elegant finish, or add a small sprinkle of flaky sea salt on top of each bar for a sophisticated sweet-salty contrast.
For special occasions, pipe melted chocolate in decorative patterns over the set maple glaze, or add edible gold leaf for an luxurious presentation.
Nutritional Considerations and Portion Control
While these are definitely a treat, the bar format makes portion control easier than traditional donuts—you can cut them into smaller squares for more reasonable serving sizes.
The recipe can be lightened slightly by substituting half the sour cream with Greek yogurt, though this will create a slightly different texture. You can also reduce the sugar in the bars by up to ¼ cup without significantly affecting the structure.
For those avoiding dairy, the bars can be made with plant-based milk and dairy-free butter substitutes, though the flavor will be slightly different.
Scaling for Different Occasions
This recipe doubles perfectly for large gatherings—use two 9×13 pans or one large sheet pan. Baking time may need slight adjustment for different pan sizes.
For smaller batches, halve the recipe and use an 8×8-inch pan, reducing the baking time by about 5 minutes. This yields 12 bars, perfect for smaller families.
The recipe also works well baked in a muffin tin for individual portions—fill cups about ⅔ full and bake for 12-15 minutes. Glaze each muffin individually for a fun presentation.
Serving Suggestions and Occasions
These maple donut bars shine at breakfast gatherings, potluck brunches, and coffee meetings where finger foods are ideal. They’re substantial enough to serve as a light breakfast alongside coffee or milk.
For children’s parties, cut into smaller squares and arrange on colorful plates—kids love the familiar donut flavor in an easy-to-eat format.
During fall and winter holidays, these bars evoke cozy, comforting feelings that make them perfect for seasonal gatherings. The maple flavor particularly complements autumn themes and Thanksgiving celebrations.
Final Thoughts
Maple Donut Bars From Scratch prove that you don’t need specialized equipment or complex techniques to create bakery-quality treats at home. By understanding the fundamentals of tender cake texture and perfect glaze consistency, you can produce bars that rival anything from your favorite donut shop while enjoying the satisfaction of making them completely from scratch.
The beauty of this recipe lies in its reliability and adaptability—once you master the basic technique, you’ll find yourself returning to it again and again, experimenting with different flavors and presentations. The bar format makes these treats more practical than traditional donuts for everyday baking, while still delivering that beloved donut experience that brings smiles to faces around your table.
Whether you’re creating a special weekend breakfast, bringing treats to the office, or simply indulging in the therapeutic process of baking something delicious, these maple donut bars deliver on every level. The combination of nostalgic flavor, tender texture, and beautiful presentation creates the kind of homemade treat that becomes a treasured family recipe, requested for birthdays and holidays, and remembered long after the last crumb disappears.