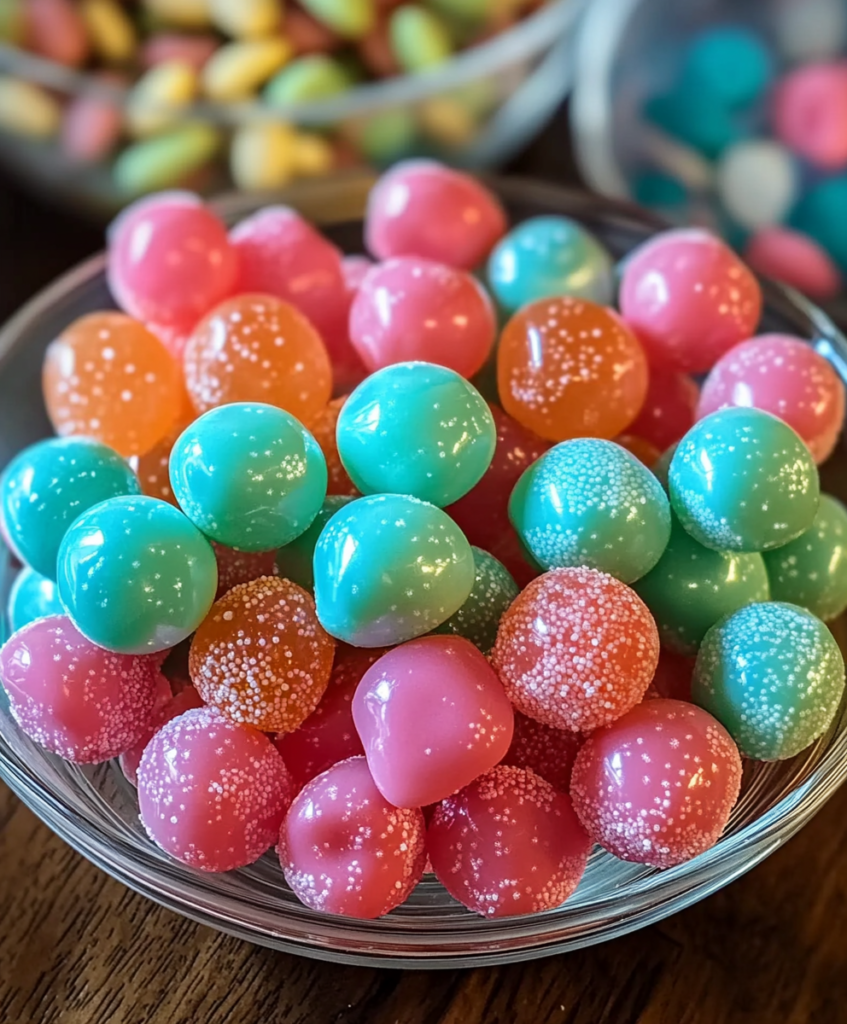
These stunning rainbow candy spheres transform simple ingredients into professional-looking confections that rival any upscale candy shop. With their glossy finish, vibrant colors, and delicate sparkle coating, they’re perfect for special occasions, gift-giving, or simply indulging your sweet tooth with something truly extraordinary.
Ingredients
For the Candy Base:
- 2 cups granulated sugar
- ¾ cup light corn syrup
- ½ cup water
- 1 teaspoon flavoring extract (vanilla, strawberry, orange, or mint)
- Food coloring (gel or liquid) in desired colors
- ¼ teaspoon citric acid (optional, for tartness)
For the Sparkle Coating:
- 1 cup fine sanding sugar or sparkling sugar
- Edible pearl dust or luster dust (optional)
- Food-safe glitter (optional)
Equipment Needed:
- Heavy-bottomed saucepan
- Candy thermometer
- Silicone sphere molds (½ to 1-inch diameter)
- Heat-resistant gloves
- Small bowls for colors
- Wooden spoons or heat-safe spatulas
Instructions
- Prepare Your Workspace: Arrange silicone molds on a flat, heat-proof surface. Have all colorings and flavorings measured and ready. Place sanding sugar in shallow dishes for coating.
- Cook the Candy Syrup: In a heavy saucepan, combine sugar, corn syrup, and water. Stir over medium heat until sugar dissolves completely. Attach candy thermometer and cook without stirring until mixture reaches 300°F (hard crack stage).
- Add Flavoring: Remove from heat immediately. Working quickly, add flavoring extract and citric acid if using. The mixture will bubble briefly.
- Divide and Color: Carefully pour hot syrup into heat-safe bowls (one for each color). Add food coloring to each bowl, stirring gently but thoroughly. Work fast as the candy will begin to thicken.
- Fill the Molds: Using a heat-resistant spoon or small ladle, carefully fill sphere mold cavities. The candy should level itself, creating smooth hemispheres. Allow to cool for 2-3 minutes until slightly firm but still warm.
- Create Full Spheres: Gently pop out the half-spheres. While still slightly warm and pliable, press two halves together, rotating gently to seal. The residual heat will fuse them.
- Apply Sparkle Coating: While spheres are still slightly tacky (about 5 minutes after forming), roll them in sanding sugar mixed with pearl dust or edible glitter. The coating will adhere naturally.
- Final Cooling: Place coated spheres on parchment paper and let cool completely, about 30 minutes.
Recipe Notes
- Prep Time: 30 minutes
- Cook Time: 20 minutes
- Cooling Time: 30 minutes
- Total Time: 1 hour 20 minutes
- Yield: Approximately 50-60 candy spheres
- Storage: Up to 2 months in airtight container
Mastering Candy Temperature
Temperature control is absolutely crucial for perfect candy spheres. At 300°F (hard crack stage), the syrup contains less than 1% water, creating candy that’s hard, glossy, and glass-like when cooled. Here’s what happens at different stages:
- 250°F (Hard Ball): Too soft, candies won’t hold shape
- 270°F (Soft Crack): Still too pliable, spheres will flatten
- 300°F (Hard Crack): Perfect for these candies
- 310°F+: Sugar begins to caramelize and brown
Invest in a quality candy thermometer and never estimate temperature. Even 5 degrees can dramatically change your results. Digital thermometers offer the most precision, but traditional mercury thermometers work well too.
Color Theory for Candy Making
Creating those stunning gradient effects requires understanding how food coloring behaves in hot sugar:
Gel Colors: Most concentrated, won’t add moisture to your candy. Use sparingly—a toothpick dip is often enough for pastel shades.
Liquid Colors: More common but require more volume for vibrant colors. May slightly affect candy texture if overused.
Natural Colors: Beet powder (pink), turmeric (yellow), spirulina (green), and butterfly pea flower (blue) create beautiful, subtle hues.
For the ombré effect seen in gourmet candies, add coloring drop by drop, testing on parchment paper until you achieve your desired shade. Remember that colors appear darker in the pot than in the finished candy.
Flavor Combinations That Shine
While single flavors are classic, consider these gourmet combinations:
- Pink spheres: Strawberry extract + tiny drop of vanilla
- Orange spheres: Orange extract + hint of cream flavor
- Green spheres: Peppermint + touch of vanilla for smoothness
- Blue spheres: Blue raspberry or cotton candy flavoring
- Purple spheres: Grape + lavender extract (use sparingly)
Add flavoring at ¼ teaspoon increments. Too much can make candy bitter or prevent proper hardening. Citric acid brightens fruit flavors—start with ⅛ teaspoon and adjust.
Professional Finishing Techniques
Creating the Perfect Sparkle: Mix 3 parts sanding sugar with 1 part pearl dust for professional shimmer. Apply when candy is at the “tacky” stage—too early and sugar dissolves, too late and it won’t stick.
Avoiding Sticky Spheres: Humidity is candy’s enemy. On humid days, add 2-5°F to your target temperature and work in an air-conditioned room if possible. Store finished candies with silica gel packets.
Achieving Glass-Like Clarity: Avoid stirring once sugar dissolves and temperature rises above 250°F. Stirring introduces air bubbles and can cause crystallization. If crystals form on pot sides, brush down with a wet pastry brush.

Troubleshooting Common Issues
Spheres Won’t Stick Together: Temperature dropped too much. Warm halves gently with a hair dryer on low setting before joining.
Candy is Cloudy: Usually from stirring during cooking or humidity. Try cooking on a dry day and resist the urge to stir.
Spheres are Sticky After Days: Stored in humid conditions or undercooked. Re-dry in a 200°F oven for 10 minutes, then re-coat with sugar.
Uneven Coloring: Add color while syrup is still very hot and stir thoroughly but gently. Gel colors distribute more evenly than liquid.
Creative Variations
Filled Spheres: Before joining halves, add a tiny drop of flavored syrup, pop rocks, or citric acid crystals for surprise centers.
Marble Effect: Drizzle two colors into molds without mixing completely. Swirl gently with a toothpick.
Galaxy Spheres: Add edible black coloring and multiple sizes of edible glitter for a cosmic effect.
Cocktail-Inspired: Use cocktail flavorings and corresponding colors—mojito (mint + lime), cosmopolitan (cranberry + orange), piña colada (coconut + pineapple).
Gift Packaging Ideas
These jewel-like candies deserve special presentation:
- Layer different colors in clear glass jars tied with ribbon
- Arrange in vintage champagne coupes for party displays
- Package in clear boxes with color-coordinated tissue paper
- Create “tasting flights” with flavor cards
- Fill organza bags for wedding or shower favors
Storage and Shelf Life
Proper storage ensures your candies remain pristine:
- Store in airtight containers with tight-fitting lids
- Layer between parchment paper to prevent sticking
- Keep in cool, dry place away from direct sunlight
- Add food-safe silica packets for extra protection
- Never refrigerate—condensation will ruin the coating
Well-stored candies maintain quality for 2 months, though they’re safe to eat much longer. The sparkle coating may dull slightly over time but flavor remains intact.
Scaling for Large Batches
For parties or gifts, you’ll want to make multiple batches rather than doubling recipes. Large volumes of candy syrup are difficult to manage and temperature control becomes challenging. Instead:
- Prepare multiple sets of colored syrups
- Work with a partner—one fills molds while the other prepares next batch
- Set up assembly-line style stations for efficiency
- Make different flavors in sequence, cleaning thermometer between batches
Safety Reminders
Molten sugar reaches temperatures that can cause severe burns:
- Never leave cooking candy unattended
- Keep children and pets away from cooking area
- Wear closed-toe shoes and avoid loose clothing
- Have a bowl of ice water nearby for accidental splashes
- Use molds on a portable tray in case you need to move quickly
Final Thoughts
Creating these professional-quality candy spheres at home combines science, art, and a touch of magic. While the technique requires precision and practice, the results are spectacular—glossy orbs that catch the light, burst with flavor, and bring genuine delight to anyone lucky enough to receive them. Start with a single color to master the technique, then let your creativity soar with color combinations and flavor pairings. Soon you’ll be crafting confections that surpass anything found in specialty candy stores, with the added satisfaction of knowing you made them yourself.