There’s something absolutely genius about taking all the flavors of a classic cheeseburger and wrapping them up in a tortilla that gets transformed into golden, crispy perfection in the air fryer. These wraps happened by accident in my kitchen one evening when I had leftover ground beef and was craving that perfect cheeseburger taste but wanted something I could eat with one hand while helping kids with homework.
The magic happens when that simple flour tortilla hits the hot air circulation – it becomes this incredibly crispy shell that holds all those familiar burger flavors inside. You get the satisfying crunch on the outside, followed by that perfect combination of seasoned beef, melted cheese, and all those classic burger fixings that make every bite nostalgic and comforting.
What makes these wraps special isn’t just their convenience, though that’s certainly a bonus. It’s how the air fryer creates this almost quesadilla-like exterior while keeping everything inside perfectly heated and the cheese gloriously melted. They’re mess-free, portable, and somehow taste even better than the sum of their parts. Perfect for busy weeknights, meal prep, or anytime you want that burger satisfaction without the fuss.
Ingredients
For the Seasoned Beef:
- 1 pound ground beef (80/20 blend preferred)
- 1 medium onion, finely diced
- 2 cloves garlic, minced
- 1 teaspoon Worcestershire sauce
- 1 teaspoon smoked paprika
- 1/2 teaspoon garlic powder
- 1/2 teaspoon onion powder
- 1/2 teaspoon salt
- 1/4 teaspoon black pepper
- 1 tablespoon olive oil
For the Burger Sauce:
- 1/3 cup mayonnaise
- 2 tablespoons ketchup
- 1 tablespoon yellow mustard
- 1 tablespoon sweet pickle relish
- 1/2 teaspoon garlic powder
- 1/4 teaspoon paprika
- Salt to taste
For Assembly:
- 4 large (10-inch) flour tortillas
- 1 1/2 cups shredded cheddar cheese
- 1/2 cup shredded mozzarella cheese
- 2 cups iceberg lettuce, finely shredded
- 1 large tomato, diced and drained
- 1/4 cup dill pickles, chopped
- 2 tablespoons red onion, finely diced (optional)
- Cooking spray or olive oil for brushing
Instructions
Start by making your burger sauce since it improves with a little time to let the flavors blend. In a small bowl, whisk together mayonnaise, ketchup, yellow mustard, pickle relish, garlic powder, paprika, and a pinch of salt until smooth. This should taste like that perfect burger shop special sauce – tangy, slightly sweet, with just enough pickle flavor to make it interesting. Set aside while you prepare the beef.
Heat olive oil in a large skillet over medium-high heat. Add the diced onion and cook for about 3-4 minutes until it starts to soften and become translucent. The onion should smell sweet and fragrant, not sharp or harsh.
Add the minced garlic to the pan and cook for another 30 seconds, just until you can smell that wonderful garlic aroma. Be careful not to let it burn, as burnt garlic will make everything taste bitter.
Add the ground beef to the skillet, breaking it up with a wooden spoon or spatula as it cooks. Let it cook for 6-8 minutes, stirring occasionally, until it’s completely browned and cooked through. You want some nice caramelization on the beef, so resist the urge to stir it too frequently.
Season the cooked beef with Worcestershire sauce, smoked paprika, garlic powder, onion powder, salt, and black pepper. Stir everything together and cook for another minute to let those spices bloom and coat the meat evenly. Remove from heat and let it cool for a few minutes. This cooling step is important – hot filling will make your tortillas soggy and harder to work with.
While the beef is cooling, prep your fresh ingredients. Shred the lettuce finely, dice the tomato and let it drain on paper towels to remove excess moisture, and chop your pickles. Having everything ready makes the assembly process much smoother and prevents your wraps from sitting too long before cooking.
Now comes the fun part – assembly. Lay one tortilla flat on your work surface. Spread about 2 tablespoons of the burger sauce in a horizontal line across the lower third of the tortilla, staying about 2 inches away from the bottom edge.
Spoon about 1/2 cup of the seasoned beef mixture over the sauce, spreading it out evenly. Don’t overfill – you need to be able to wrap this up without everything spilling out.
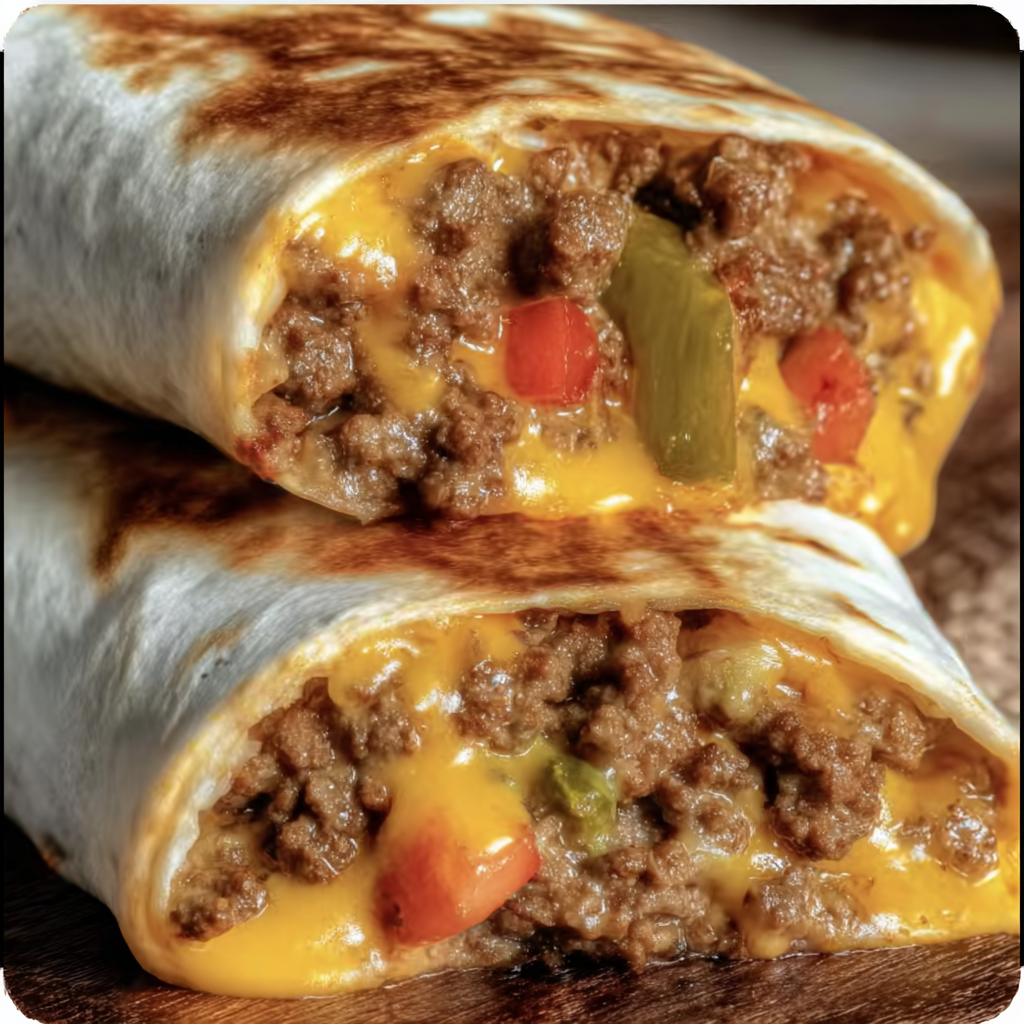
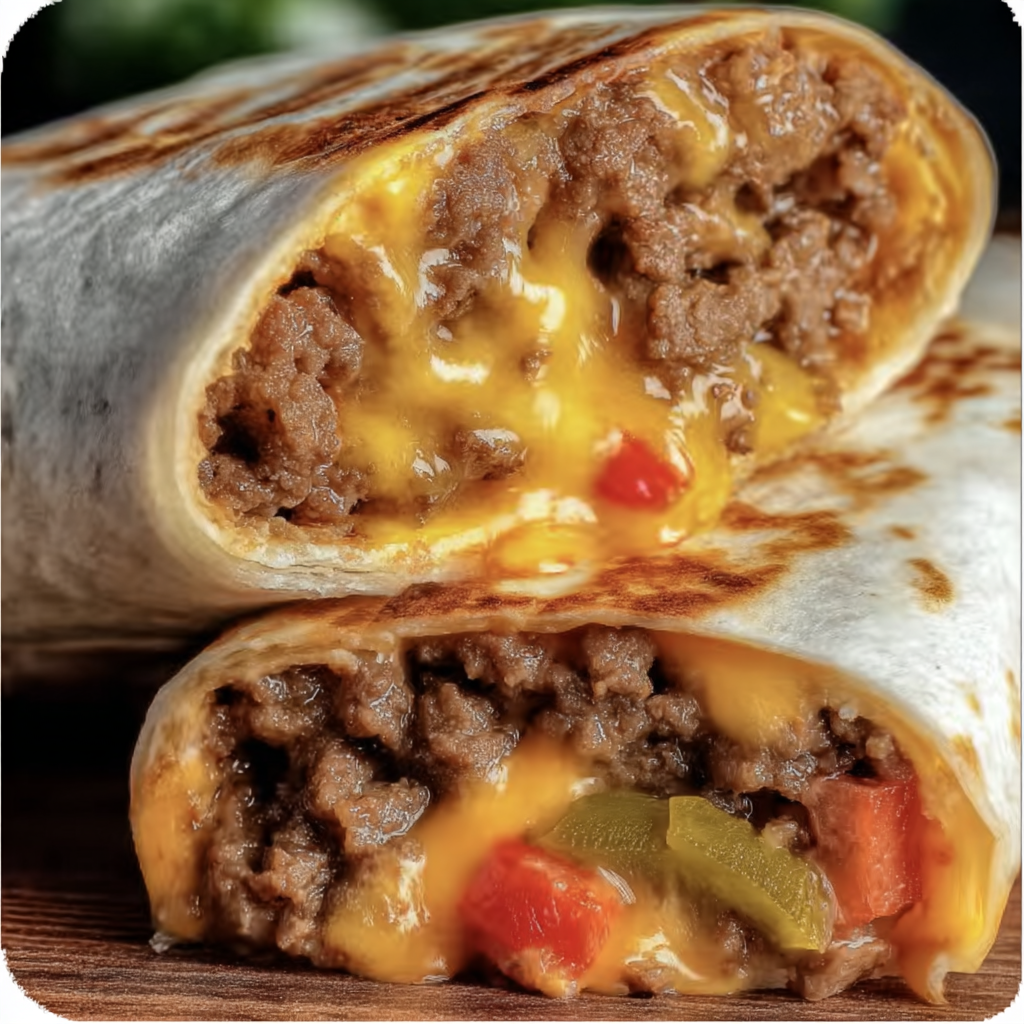
Sprinkle a generous amount of both cheddar and mozzarella cheeses over the beef. The combination gives you the best of both worlds – sharp cheddar flavor and mozzarella’s superior melting qualities.
Add a handful of shredded lettuce, some diced tomato, chopped pickles, and a sprinkle of red onion if you’re using it. Remember, you want every bite to have some of each element, but don’t go overboard or your wrap won’t close properly.
To wrap it up, fold the bottom edge over the filling first, then fold in both sides, and roll tightly from bottom to top. Think burrito-style rolling – keep it snug but not so tight that you tear the tortilla. Place it seam-side down and repeat with the remaining tortillas.
Preheat your air fryer to 375°F (190°C). While it’s heating, lightly brush or spray each wrap with olive oil on both sides. This oil is what creates that beautiful golden, crispy exterior that makes these wraps so special.
Place 2 wraps in your air fryer basket, making sure they don’t touch each other. Cook for 4 minutes, then carefully flip them over and cook for another 3-4 minutes until they’re golden brown and crispy all over. The cheese should be completely melted inside, and the tortilla should sound crispy when you tap it lightly.
Let the wraps cool for 2-3 minutes before cutting. This brief rest allows the cheese to set up slightly and prevents everything from oozing out when you slice them. Cut diagonally with a sharp knife for the best presentation.
Flavor & Texture Notes
These air fryer cheeseburger wraps deliver an incredible textural experience that elevates the humble wrap into something truly special. The exterior develops this amazing golden crispiness that’s reminiscent of a perfectly grilled quesadilla, with just enough crunch to provide satisfying contrast to the soft, melty interior.
Inside, you get all those classic cheeseburger flavors working in perfect harmony. The seasoned ground beef has a rich, savory depth enhanced by the caramelized onions and blend of spices. The melted cheese creates creamy pockets throughout the wrap, binding all the ingredients together while adding that essential cheeseburger richness.
The fresh lettuce provides a crisp, cool contrast that brightens each bite, while the tomatoes add juicy bursts of acidity. The pickles contribute that signature tangy crunch that’s essential to the cheeseburger experience, and the burger sauce ties everything together with its creamy, slightly sweet, and tangy flavor profile.
What’s really remarkable is how the air fryer transforms the simple flour tortilla into something that feels almost decadent – crispy and golden on the outside, yet still tender enough to bite through easily. Each bite delivers the perfect ratio of crispy exterior to melty, flavorful interior.
Tips & Variations
The key to perfect wraps starts with using the right tortillas. Large, burrito-size flour tortillas work best because they’re sturdy enough to hold all the filling and flexible enough to wrap without cracking. Avoid thin tortillas that might tear during rolling or cooking.
Moisture control is crucial for preventing soggy wraps. Always let your cooked beef cool slightly before assembly, drain diced tomatoes on paper towels, and don’t go overboard with wet ingredients like pickles or extra sauce. A little goes a long way.
For cheese lovers, experiment with different combinations. Sharp cheddar and pepper jack create a spicier version, while American cheese gives you that classic fast-food burger taste. Adding a small amount of cream cheese to your cheese mix creates an extra creamy texture.
Make these wraps your own by adding bacon bits, sautéed mushrooms, or jalapeños for heat. Avocado works wonderfully too, though add it after air frying to prevent it from becoming mushy.
If you’re looking for a lighter option, ground turkey or chicken work well in place of beef. Just adjust the seasonings slightly since poultry can be a bit milder than beef.
Don’t have an air fryer? No problem. These work great in a regular skillet over medium heat (about 2-3 minutes per side), in a panini press, or even in a 400°F oven for 8-10 minutes, flipping halfway through.
Storage & Make-Ahead
These wraps are fantastic for meal prep. You can assemble them completely and store them wrapped in plastic wrap in the refrigerator for up to 24 hours before air frying. This actually allows the flavors to meld together even more.
The burger sauce can be made up to a week ahead and stored in the refrigerator. The cooked and seasoned beef mixture keeps well for 3-4 days refrigerated and can be quickly reheated when you’re ready to assemble wraps.
Leftover cooked wraps store in the refrigerator for up to 3 days. To reheat and restore some crispiness, pop them back in the air fryer at 350°F for 2-3 minutes per side. They won’t be quite as crispy as when fresh, but still delicious.
For longer storage, you can freeze assembled uncooked wraps for up to 2 months. Wrap each one individually in plastic wrap, then place in freezer bags. Cook directly from frozen, adding an extra 2-3 minutes to the cooking time.
Serving Suggestions
These wraps are hearty enough to serve as a complete meal, but they pair beautifully with classic burger accompaniments. Air fryer french fries or sweet potato fries make the perfect crispy side dish that cooks in the same appliance.
A simple garden salad or coleslaw provides a fresh, cooling contrast to the rich, cheesy wraps. The acidity in a vinaigrette-dressed salad cuts through the richness beautifully.
For entertaining, cut each wrap in half diagonally and serve as finger food or appetizers. They’re much easier for guests to manage than traditional burgers and far less messy.
These also work wonderfully for outdoor gatherings. You can prep them ahead, then air fry them in batches and keep them warm in a low oven until ready to serve.
FAQ
Why do my wraps keep opening up during cooking? Make sure you’re rolling them tightly and placing them seam-side down in the air fryer. If they’re still opening, you can secure them with toothpicks – just remember to remove them before serving. Also, let your filling cool slightly before wrapping to prevent steam from making the tortilla soggy.
Can I use a different type of tortilla? Flour tortillas work best for this recipe because they’re flexible and create the best crispy texture. Corn tortillas tend to crack when wrapped and don’t get as crispy. Whole wheat flour tortillas are a good healthy alternative.
What if I don’t have both types of cheese? You can use just one type of cheese if that’s what you have. Cheddar gives great flavor, while mozzarella melts beautifully. Even American cheese slices work in a pinch for that classic cheeseburger taste.
How do I prevent soggy wraps? The key is controlling moisture. Drain your cooked beef, pat tomatoes dry, don’t overfill with sauce, and let everything cool slightly before assembly. Also, don’t let assembled wraps sit too long before cooking.
Can I make these ahead for a party? Absolutely! You can assemble them up to a day ahead, wrap in plastic wrap, and refrigerate. Air fry them just before serving. For parties, consider making them smaller by cutting the tortillas in half and making mini wraps.
These air fryer cheeseburger wraps prove that sometimes the best recipes come from thinking outside the box. They capture everything we love about cheeseburgers while solving the practical problems – no messy eating, perfect for meal prep, and endlessly customizable. Whether you’re feeding hungry teenagers, looking for a quick weeknight dinner solution, or planning party food that will disappear fast, these crispy, melty wraps deliver comfort food satisfaction in every single bite.