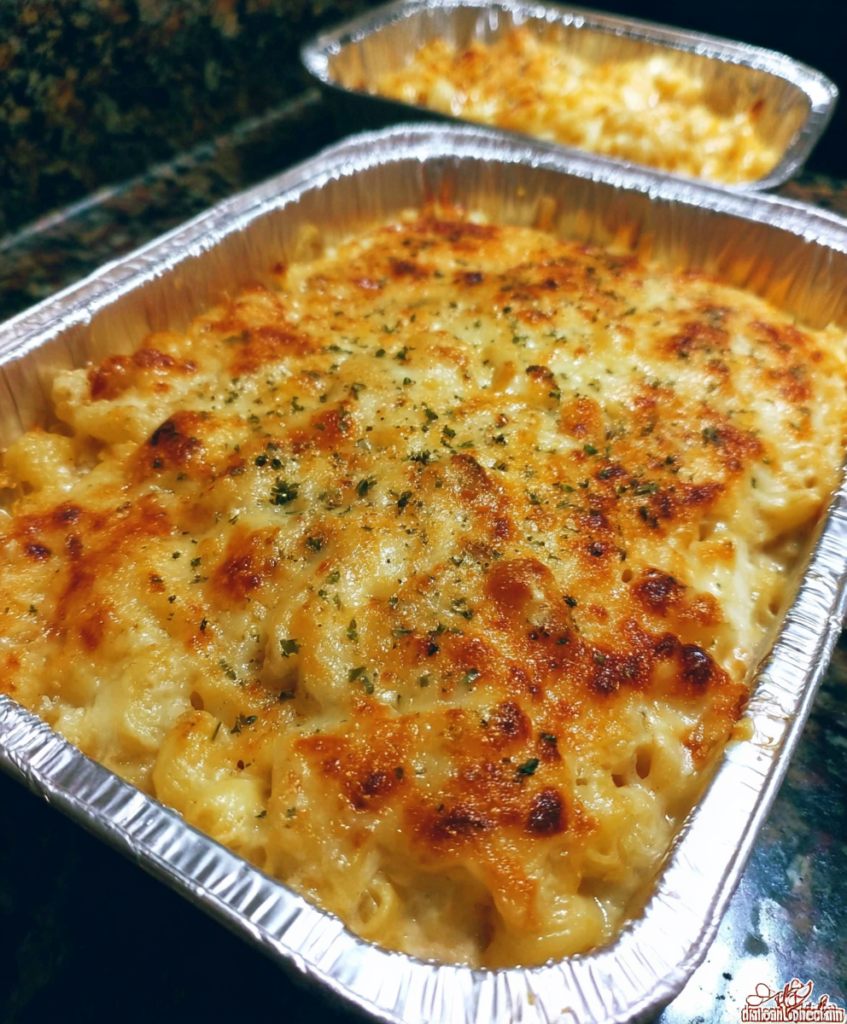
Nothing says comfort food quite like a bubbling pan of homemade baked mac and cheese, with its golden-brown top giving way to layers of tender pasta enveloped in rich, creamy cheese sauce. This isn’t the boxed version from your childhood—this is the real deal, built from scratch with a silky cheese sauce that clings perfectly to every elbow of pasta. The secret lies in creating a proper roux-based cheese sauce and choosing the right combination of cheeses for both flavor and meltability, then finishing it all with a crispy breadcrumb topping that adds textural contrast to every forkful.
Ingredients
For the Pasta:
- 1 lb elbow macaroni (or shells, cavatappi, or penne)
- 2 tablespoons salt (for pasta water)
For the Cheese Sauce:
- 6 tablespoons unsalted butter
- ½ cup all-purpose flour
- 4 cups whole milk, warmed
- 1 cup heavy cream
- 2 teaspoons Dijon mustard
- 1 teaspoon garlic powder
- ½ teaspoon onion powder
- ½ teaspoon smoked paprika
- ¼ teaspoon cayenne pepper
- 1 teaspoon salt
- ½ teaspoon black pepper
- 3 cups sharp cheddar cheese, freshly grated
- 2 cups Gruyère cheese, freshly grated
- 1 cup cream cheese, cubed and softened
For the Topping:
- 1½ cups panko breadcrumbs
- 3 tablespoons butter, melted
- ½ cup Parmesan cheese, grated
- 1 tablespoon fresh thyme leaves
- ¼ teaspoon garlic powder
- Pinch of salt
Instructions
Step 1: Prepare Your Setup
Preheat your oven to 375°F and generously butter a 9×13-inch baking dish or two smaller 8×8-inch dishes for individual servings. Position a rack in the center of your oven for even browning.
Bring a large pot of water to boil and add the salt—the water should taste like seawater. This is your only chance to season the pasta itself, so don’t skip the salt. While waiting for the water to boil, warm your milk in a small saucepan over low heat or in the microwave. Warm milk incorporates more smoothly into the roux, preventing lumps.
Step 2: Cook the Pasta Perfectly
Add the macaroni to the boiling water and cook according to package directions minus 2 minutes—you want it very al dente since it will continue cooking in the oven. The pasta should have a slight bite when you test it, as it will soften further during baking.
Reserve 1 cup of the starchy pasta cooking water before draining—this liquid gold can help adjust the consistency of your cheese sauce if needed. Drain the pasta thoroughly and set aside.
Step 3: Master the Roux
In a large, heavy-bottomed saucepan or Dutch oven, melt the butter over medium heat. Once it stops foaming, add the flour and whisk constantly to create a roux. Cook this mixture for 2-3 minutes, whisking continuously, until it smells nutty and turns a light golden color.
This cooking step eliminates the raw flour taste and creates the foundation for a smooth, thickened sauce. The roux should bubble gently but not brown aggressively—adjust your heat as needed.
Step 4: Build the Cheese Sauce Base
Gradually add the warm milk to the roux, whisking constantly to prevent lumps. Start with just a splash, whisking until smooth, then gradually increase the amount as the mixture emulsifies. This gradual addition is crucial for a silky-smooth sauce.
Once all the milk is incorporated, add the heavy cream and bring the mixture to a gentle simmer. Cook for 5-7 minutes, stirring frequently, until the sauce coats the back of a spoon and has thickened noticeably.
Stir in the Dijon mustard, garlic powder, onion powder, smoked paprika, cayenne, salt, and pepper. The mustard adds tang and helps emulsify the cheese, while the spices create depth without overpowering the cheese flavors.
Step 5: Incorporate the Cheese Magic
Remove the sauce from heat—this is crucial as direct heat can cause cheese to seize and become grainy. Add the cubed cream cheese first, whisking until completely melted and incorporated. The cream cheese adds richness and helps create that ultra-smooth texture.
Add the grated cheddar and Gruyère in handfuls, whisking after each addition until completely melted before adding more. This gradual process ensures smooth melting without graininess. If the sauce seems too thick, add some reserved pasta water, a few tablespoons at a time.
Taste and adjust seasoning—the sauce should be well-seasoned on its own since it will be diluted slightly when combined with the pasta.
Step 6: Combine and Assemble
Add the cooked pasta to the cheese sauce and fold gently with a large spoon or rubber spatula until every piece of pasta is thoroughly coated. The mixture should look creamy and abundant—there should be plenty of sauce to keep the mac and cheese moist during baking.
Transfer the mixture to your prepared baking dish, spreading it evenly but not packing it down. The surface should look slightly irregular, which helps the topping adhere and creates interesting textural contrast.
Step 7: Create the Perfect Topping
In a medium bowl, combine panko breadcrumbs, melted butter, grated Parmesan, fresh thyme, garlic powder, and salt. Mix thoroughly until the breadcrumbs are evenly coated with butter and the mixture feels cohesive.
Sprinkle this mixture evenly over the mac and cheese, creating a generous layer that will become golden and crispy. Don’t pack it down—you want some texture and height for maximum crunch.
Step 8: Bake to Golden Perfection
Bake for 25-30 minutes, until the top is golden brown and the edges are bubbling enthusiastically. The center should be hot throughout—test with a knife inserted in the middle; it should come out warm to the touch.
If the top browns too quickly before the center is heated through, cover loosely with foil and continue baking. If it needs more browning, move to the top rack for the last 5 minutes.
Let rest for 10 minutes before serving to allow the sauce to set slightly and prevent burning your tongue on molten cheese.
Prep Time: 30 minutes | Cook Time: 30 minutes | Total Time: 1 hour | Servings: 8-10 | Calories: 485 per serving
The Art of Cheese Selection
The cheese blend in this recipe isn’t arbitrary—each variety serves a specific purpose in creating the perfect mac and cheese experience. Sharp cheddar provides the classic mac and cheese flavor that everyone expects, with enough sharpness to cut through the richness of the cream and butter.
Gruyère adds sophistication and depth with its nutty, slightly sweet flavor while contributing superior melting properties. This Swiss cheese melts smoothly without becoming stringy or greasy, creating that perfect sauce consistency.
Cream cheese might seem like an unusual addition, but it’s the secret weapon for achieving restaurant-quality smoothness. Unlike other cheeses that can become grainy when heated, cream cheese maintains its silky texture and adds richness without competing flavors.
For best results, always grate your own cheese from blocks rather than using pre-shredded varieties. Pre-shredded cheese contains anti-caking agents that can prevent smooth melting and create a gritty texture in your sauce.
Mastering the Roux Technique
The roux—that mixture of butter and flour cooked together—is the backbone of your cheese sauce. Getting this right makes the difference between smooth, velvety mac and cheese and a lumpy, broken mess.
The key is patience and constant whisking. When you first add flour to melted butter, it will form a thick paste. Continue cooking while whisking for 2-3 minutes to cook out the raw flour taste and develop a slightly nutty aroma. This creates what French chefs call a “blonde roux.”
Temperature control is crucial when adding liquid to your roux. Cold liquid added to hot roux can cause immediate lumping. Warm milk, added gradually while whisking constantly, creates a smooth base that will thicken beautifully as it heats.
If you do encounter lumps, don’t panic. Continue whisking vigorously, and most lumps will dissolve. For stubborn lumps, strain the sauce through a fine-mesh sieve before adding the cheese.

Pasta Shape Matters
While elbow macaroni is traditional, the best pasta shapes for baked mac and cheese are those with curves, ridges, or hollow centers that trap cheese sauce. Shells, cavatappi (corkscrew-shaped), rotini, and penne all work beautifully.
Avoid long pasta like spaghetti or linguine, which don’t hold sauce well and can become tangled during mixing. Also skip delicate shapes like angel hair or thin egg noodles, which can become mushy during the baking process.
Cook your pasta until very al dente—it should have a definite bite since it will continue cooking in the oven. Overcooked pasta will become mushy and unpleasant in the final dish.
Creative Flavor Variations
This base recipe welcomes numerous delicious variations. For a smoky twist, add ½ cup of diced roasted peppers and increase the smoked paprika to 1 teaspoon. The sweetness of roasted peppers complements the cheese beautifully.
Vegetable lovers can fold in steamed broccoli florets, roasted cauliflower, or sautéed mushrooms before baking. Add vegetables during the last 5 minutes of pasta cooking to ensure they’re tender but not overcooked.
For protein additions, consider diced ham, cooked chicken, or even lobster for an upscale version. Add cooked proteins when combining the pasta and sauce to ensure even distribution without overcooking.
Spice enthusiasts can amp up the heat with additional cayenne, diced jalapeños, or a dash of hot sauce mixed into the cheese sauce. The creamy base tames the heat while allowing the flavors to shine through.
Troubleshooting Common Issues
Grainy or Broken Sauce: This usually happens when cheese is added to sauce that’s too hot, or when cheese is heated too aggressively. Always remove the sauce from heat before adding cheese, and add it gradually.
Too Thick: Thin with reserved pasta water, warm milk, or cream, adding small amounts until you reach desired consistency. Remember that the sauce will thicken slightly as it cools and during baking.
Too Thin: If your sauce seems thin, cook it a bit longer before adding cheese, or add a bit more grated cheese. You can also mix a tablespoon of cornstarch with cold milk and stir it into the sauce.
Dry After Baking: This often indicates the sauce was too thick to begin with, or the oven temperature was too high. Cover with foil if it seems to be drying out during baking.
Make-Ahead and Storage Strategies
This mac and cheese can be assembled completely up to 2 days ahead of baking—just cover tightly and refrigerate. Add an extra 10-15 minutes to the baking time if cooking from cold.
For freezing, assemble the dish but don’t add the breadcrumb topping. Wrap tightly and freeze for up to 3 months. Thaw completely in the refrigerator, then add fresh breadcrumb topping before baking.
Leftover baked mac and cheese keeps in the refrigerator for up to 4 days. Reheat individual portions in the microwave, or reheat the entire dish in a 350°F oven until heated through.
Scaling for Crowds
This recipe doubles or triples easily for large gatherings. Use multiple baking dishes rather than one enormous pan to ensure even cooking. Smaller dishes also allow for easier serving and different topping variations for diverse tastes.
For very large groups, consider making the cheese sauce in batches rather than one enormous pot—it’s easier to manage and ensures consistent results.
The Science of Perfect Texture
The combination of techniques in this recipe creates multiple textural elements that make each bite interesting. The roux-thickened sauce clings to pasta without being gluey, while the combination of cheeses provides both flavor and optimal melting characteristics.
The breadcrumb topping serves both practical and aesthetic purposes—it prevents the surface from drying out during baking while creating textural contrast and visual appeal.
Resting the finished dish before serving allows the sauce to set slightly, making it easier to serve neat portions while ensuring the cheese isn’t molten enough to burn your mouth.
Nutritional Considerations
While undeniably indulgent, this mac and cheese can be part of a balanced meal when served with appropriate portions and nutritious sides. Consider serving smaller portions alongside a large salad or roasted vegetables.
For lighter versions, you can substitute half the heavy cream with additional milk, or use a combination of full-fat and reduced-fat cheeses. However, these substitutions will affect the final texture and richness.
The dish provides significant protein from the cheese and some calcium, making it more nutritionally substantial than many side dishes.
Serving Suggestions and Pairings
This rich, creamy mac and cheese pairs beautifully with bright, acidic sides that cut through the richness. A simple green salad with vinaigrette, steamed green vegetables, or roasted Brussels sprouts provide perfect balance.
For casual family dinners, serve alongside grilled chicken or roasted vegetables. The neutral flavor profile complements virtually any protein without competing for attention.
During holiday gatherings, this makes an excellent side dish that appeals to both adults and children—a rare feat that makes meal planning easier.
Final Thoughts
Homemade baked mac and cheese represents everything wonderful about comfort food cooking—it transforms simple, humble ingredients into something extraordinary through proper technique and attention to detail. The difference between this scratch-made version and anything from a box is profound, creating an experience that satisfies both nostalgic cravings and sophisticated palates.
The beauty of mastering this recipe lies not just in the immediate satisfaction it brings to your table, but in understanding the fundamental techniques that apply to countless other dishes. Learning to make a proper roux, understanding how cheese behaves when heated, and developing an instinct for seasoning and texture will serve you well throughout your cooking journey.
Whether you’re feeding a crowd during the holidays, creating a special family dinner, or simply indulging in the ultimate comfort food experience, this mac and cheese delivers on every level. The combination of creamy, cheesy interior and crispy, golden topping creates a harmony of textures and flavors that never gets old, no matter how many times you make it. This is the kind of recipe that becomes a family tradition, requested for birthdays and holidays, and remembered long after the last bite is gone.